Website speed matters. A slow-loading site frustrates visitors and leads to higher bounce rates.
GZIP compression is a quick way to fix that!
It reduces the size of your site’s files, so they load faster without compromising quality. Setting it up on WordPress takes just a few steps and can make a big difference in your site’s performance.
- Why Loading Time Matters and What Can Slow It Down
- What GZIP Compression Is and How It Works
- Is GZIP Enabled? How to Check If Compression Is Active On WordPress
- How to Enable GZIP Compression for WordPress Site?
- Key Mistakes to Avoid When Implementing GZIP Compression
- 5 Advantages of GZIP Compression
- Alternatives to GZIP Compression
- Tabular Overview: GZIP Compression for WordPress
- Wrapping Up: GZIP Compression and Beyond
- FAQs
In this guide, we’ll show you what GZIP is, how GZIP compression for WordPress works, and how to enable it on your site.
But before we fully appreciate how WordPress GZIP can help, let's first understand why fast page loading is so important.
Why Loading Time Matters and What Can Slow It Down
Page speed matters because it directly impacts user experience and conversion rates.
Studies show that 47% of users expect a website to load in two seconds or less. If it takes longer, visitors tend to abandon the site. Also, 79% of customers say they are less likely to purchase if the e-commerce site performs poorly.
Let’s look at the reasons why a website can load slowly.
What Makes A Website Slow?
- Large Images: Uncompressed images take longer to load, impacting the site's performance.
- Render-Blocking JavaScript: JavaScript files block the rendering of the page and delay content display.
- Unoptimized Media Files: Videos and heavy media files consume considerable server space and slow download times.
- Excessive HTTP Requests: Too many requests overwhelm the server, increasing load time.
If you’ve noticed slow load times when testing your site with tools like Google PageSpeed Insights, GTmetrix, or Pingdom, you might have already spotted some of these issues.
In that case, GZIP compression is the solution you need to improve your site’s speed. Let’s learn what it is and how it works.
What GZIP Compression Is and How It Works
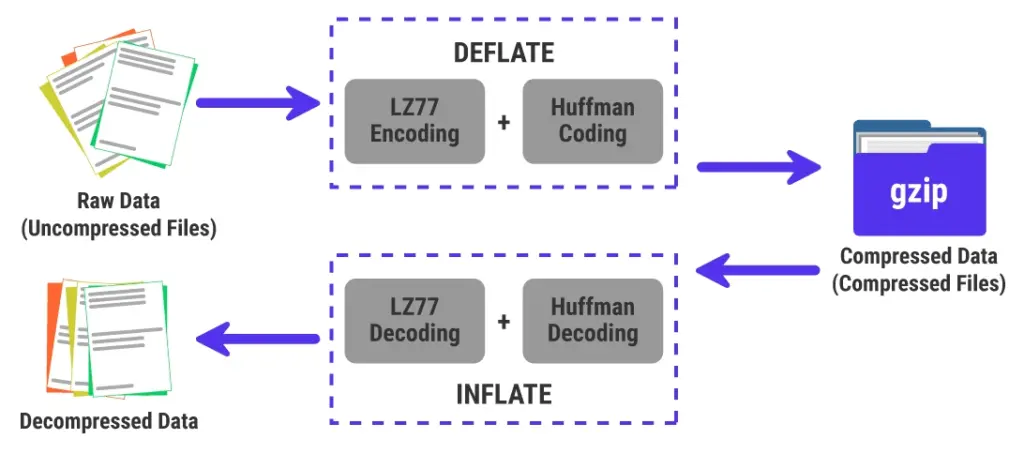
“GZIP stands for GNU Zip and is a widely used method for compressing data on the web. It helps reduce the size of your site's HTML files, CSS, and JavaScript to make your website load faster. GZIP is not just a compression technique. It also refers to the .gz file extension and a software tool for compressing and decompressing files.”
GZIP uses the DEFLATE algorithm, a combination of the LZ77 encoding and Huffman coding algorithms. This algorithm compresses data without losing any information, ensuring your files stay intact but take up less space.
Is GZIP Enabled? How to Check If Compression Is Active On WordPress
GZIP compression is a server-side feature, not something WordPress directly controls. Many hosting providers include it in their default configurations, especially with premium plans. Verifying its status on your site is simple and involves using external tools or browser-based methods.
Online testing tools like GTmetrix can indicate if GZIP compression is active on your website. A warning usually appears if it is not enabled. Alternatively, GZIP compression testing tools are available to check if your site is using this feature.
Browser developer tools provide another way to confirm GZIP compression. When active, the response header includes the line: content-encoding: GZIP.
For Chrome users, follow these steps to locate the response header:
- Open Developer Tools.
- Go to the "Network" tab.
- Reload your website.
- Click on the network request corresponding to your site.
- View the response headers for the line indicating GZIP compression.
These straightforward checks help ensure your site delivers optimized performance for faster load times.
How to Enable GZIP Compression for WordPress Site?
If your site isn’t set up for GZIP compression for WordPress yet, there are a few methods you can use to enable it. Here, we’ll explore how to set up GZIP using different approaches tailored to varying levels of expertise.
Let's begin with the simplest option to compress components with GZIP for WordPress using plugins. This method is beginner-friendly and requires minimal effort to implement.
1. Enabling Compression via Plugins
Plugins offer a convenient way to enable GZIP compression for WordPress without technical complexity. Here’s how to use three popular plugins to enable GZIP compression.
WP ROCKET
Here’s how you can use WP Rocket to enable GZIP compression for WordPress.
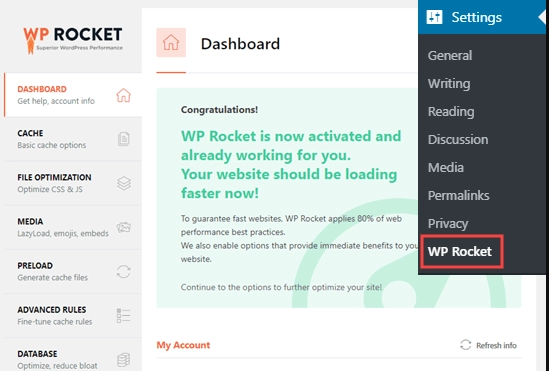
- Install and activate the WP Rocket plugin.
- Once activated, go to Settings > WP Rocket in your WordPress admin panel.
- WP Rocket automatically enables GZIP compression if your site runs on an Apache server, which most hosting providers use.
WP Rocket adds GZIP compression rules to the .htaccess file using the mod_deflate module. WP Rocket GZIP ensures better performance without manual configuration.
W3 TOTAL CACHE
Here’s how you can enable GZIP compression for WordPress using W3 Total Cache.
- Install and activate the W3 Total Cache plugin.
- Navigate to Performance > General Settings in your WordPress dashboard.
- Locate the Browser Cache section and check the box labeled Enable HTTP compression.
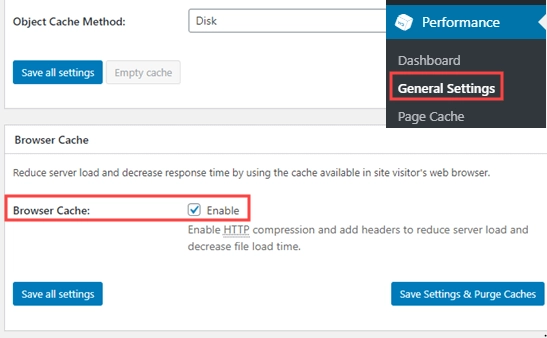
- Save the changes to apply the settings.
W3 Total Cache includes a free version and offers advanced customization options. This plugin works well for users familiar with WordPress caching configurations.
WP SUPER CACHE
Here’s how you can use WP Super Cache to enable GZIP compression for WordPress.
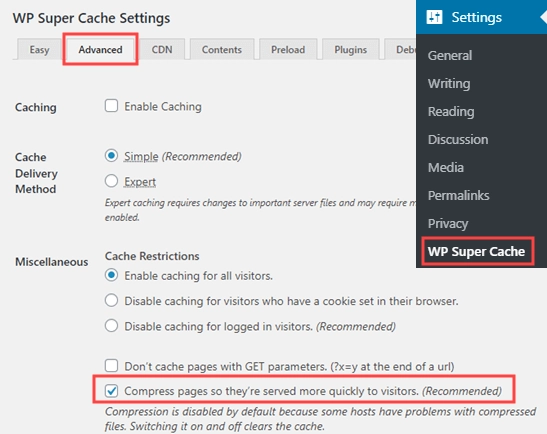
- Install and activate the WP Super Cache plugin.
- Go to Settings > WP Super Cache > Advanced in your WordPress dashboard.
- Check the box labeled Compress pages so they’re served more quickly to visitors.
- Scroll down and click Update Status to save the settings.
WP Super Cache compresses web pages efficiently and is especially helpful for users looking for a free and simple solution.
2. Enabling GZIP Compression for Apache (By Editing The .htaccess File)
After plugins, editing the .htaccess file is another way to enable compression. While not the most intuitive method, it’s straightforward enough if you’re comfortable making manual changes. The .htaccess file controls many aspects of your site's communication with the server, especially on Apache servers.
However, changing this file comes with a slight risk: incorrect edits could bring down your website. To avoid any issues, ensure that you back up your website and the original .htaccess file before making any changes.
You can usually find the .htaccess file in your website’s root directory. It might be hidden by default, so you might need to adjust your FTP settings to view hidden files.
Once located, it's a good idea to download a copy to your local machine to work on it. That way, if something goes wrong, you can restore it quickly.
Here’s how to proceed:
- Open Your Site’s .htaccess File
Access the .htaccess file via FTP. If you don't already have an FTP client, you can use FileZilla (a free and open-source tool). Once you’re connected, navigate to the root directory (usually called public_html, but it could also be named after your site or www).
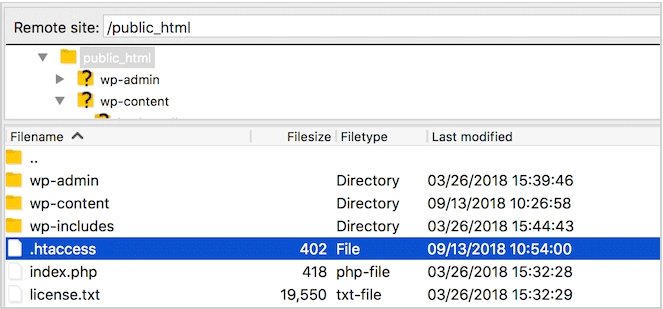
Right-click the .htaccess file and select "View/Edit" to open it in your default text editor.

- Edit the File to Enable GZIP Compression
Now, it’s time to add the necessary code to enable GZIP compression. Insert the following lines above the # END WordPress tag:
| <IfModule mod_deflate.c>AddOutputFilterByType DEFLATE text/htmlAddOutputFilterByType DEFLATE text/cssAddOutputFilterByType DEFLATE text/javascriptAddOutputFilterByType DEFLATE text/xmlAddOutputFilterByType DEFLATE text/plainAddOutputFilterByType DEFLATE image/x-iconAddOutputFilterByType DEFLATE image/svg+xmlAddOutputFilterByType DEFLATE application/rss+xmlAddOutputFilterByType DEFLATE application/javascriptAddOutputFilterByType DEFLATE application/x-javascriptAddOutputFilterByType DEFLATE application/xmlAddOutputFilterByType DEFLATE application/xhtml+xmlAddOutputFilterByType DEFLATE application/x-fontAddOutputFilterByType DEFLATE application/x-font-truetypeAddOutputFilterByType DEFLATE application/x-font-ttfAddOutputFilterByType DEFLATE application/x-font-otfAddOutputFilterByType DEFLATE application/x-font-opentypeAddOutputFilterByType DEFLATE application/vnd.ms-font objectAddOutputFilterByType DEFLATE font/ttfAddOutputFilterByType DEFLATE font/otfAddOutputFilterByType DEFLATE font/opentype# For Older Browsers Which Can't Handle CompressionBrowserMatch ^Mozilla/4 GZIP-only-text/htmlBrowserMatch ^Mozilla/4\.0[678] no-GZIPBrowserMatch \bMSIE !no-GZIP !GZIP-only-text/html</IfModule> |
This code activates GZIP compression for common file types such as HTML, CSS, JavaScript, and fonts. If your server doesn't support mod_deflate, you can use an alternative code snippet, which uses mod_GZIP instead:
| <ifModule mod_GZIP.c>mod_GZIP_on Yesmod_GZIP_dechunk Yesmod_GZIP_item_include file \.(html?|txt|css|js|php|pl)$mod_GZIP_item_include mime ^application/x-javascript.*mod_GZIP_item_include mime ^text/.*mod_GZIP_item_exclude rspheader ^Content-Encoding:.*GZIP.*mod_GZIP_item_exclude mime ^image/.*mod_GZIP_item_include handler ^cgi-script$</ifModule> |
Once done, save the .htaccess file. FTP software will prompt you to upload the modified file. Choose "Yes" to overwrite the original file on the server.
- Test GZIP Compression
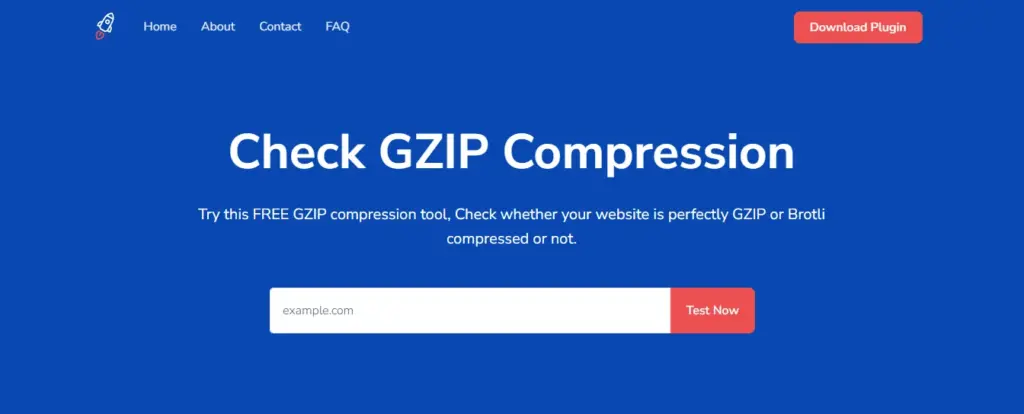
After updating the .htaccess file, test if GZIP compression is working. You can use tools like Check GZIP Compression to verify. Enter your site’s URL; the tool will tell you if GZIP is active. If everything is set up correctly, the result will indicate success.
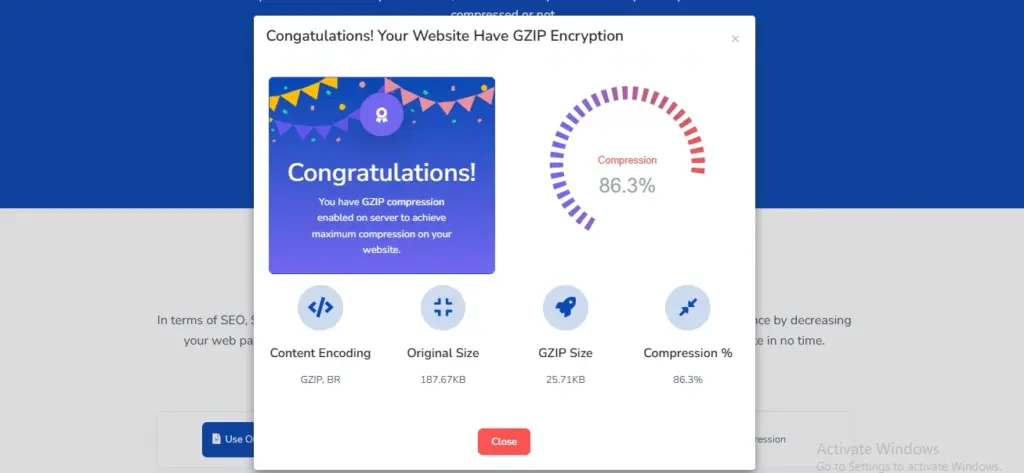
[This image shows what appears when we enter siteaim.com in the URL bar]
If the test fails, try one of the following:
- Wait a few minutes for the changes to take effect.
- Clear your website’s cache.
- Double-check the syntax in the .htaccess file for any errors.
3. Enabling GZIP Compression for Nginx
For websites running on Nginx, enabling GZIP compression requires a few simple steps. Start by adding a specific code snippet to your site's nginx.conf file. The best place to put this code is in the "http" section, but you can also add it to the server or location configuration block.
| GZIP on;GZIP_types text/plain text/css text/javascript image/svg+xml image/x-icon application/javascript application/x-javascript;GZIP_min_length 1000;GZIP_vary on;GZIP_proxied no-cache no-store private expired auth;GZIP_diable "MSIE [1-6]; |
Once you've added the snippet, save and close the file. To apply the changes, restart Nginx with this command:
sudo service nginx restart
After restarting, verify that GZIP compression for WordPress is working by using the methods mentioned earlier.
4. Contacting Your Web Host to Enable GZIP Compression
If all the above methods feel too complicated or you’re stuck, reaching out to your web host could be the easiest option. Many people find that enabling GZIP compression can be tricky, especially when it involves editing site files.
If that sounds like you, simply contact your web host’s support team for assistance. They’re usually more than willing to help you optimize your site’s speed and ensure everything is running smoothly.
Now that we've gone through the steps to enable GZIP compression for WordPress, let's talk about some mistakes you'll want to avoid during the process.
Key Mistakes to Avoid When Implementing GZIP Compression
Avoiding common mistakes during GZIP compression implementation can save you time and resources. Many developers overlook key areas that can cause issues with performance and compatibility.
Let’s go over the pitfalls you should watch out for to ensure a smooth and effective GZIP setup.
1. Inadequate Server Configuration
Ensure your server supports GZIP compression. Without proper server configuration, GZIP won't function correctly. For instance, if Apache's mod_deflate module isn't enabled, compression won't work.
2. Misconfigured .htaccess File
Incorrect settings in the .htaccess file can prevent GZIP compression. Ensure that the file contains the correct directives to enable compression.
For example, adding the following lines can enable GZIP compression:
<IfModule mod_deflate.c>
AddOutputFilterByType DEFLATE text/html text/plain text/xml text/css application/javascript application/x-javascript application/xml
</IfModule>
3. Conflicts with Caching Plugins
Some caching plugins may interfere with GZIP compression. Some users have reported issues with GZIP not functioning properly when using certain plugins.
4. Overlooking Image Optimization
GZIP compression doesn't compress images. To optimize images, consider using plugins like EWWW Image Optimizer. However, ensure compatibility between your GZIP settings and image optimization plugins.
5. Ignoring Browser Compatibility
While most modern browsers support GZIP compression, it's important to test your website across different browsers to ensure consistent performance.
6. Not Monitoring Performance
Regularly monitor your website's performance to ensure that GZIP compression continues to function correctly and that no new issues arise.
5 Advantages of GZIP Compression
GZIP compression has various advantages that can improve your website's speed and overall performance.
Let's look at the most important benefits of enabling text compression for WordPress using GZIP.
1. Delivers a Good Compression Ratio
GZIP can reduce the size of text-based files by 70-90%. While it may not provide the absolute best compression ratio compared to other tools, it still delivers a solid reduction in file size.
2. Fast Compression and Decompression
GZIP excels in terms of speed. It compresses and decompresses data quickly, making it ideal for websites with high traffic.
The real-time compression ability ensures that files are processed swiftly without any noticeable delay. This makes it a reliable choice for web servers that need to handle multiple data streams simultaneously.
3. Uses Minimal Memory
GZIP has a small memory footprint. This makes it particularly useful for servers with limited memory or hosting environments with constrained resources.
Even the most affordable hosting services support GZIP compression, meaning you don’t have to worry about memory usage impacting server performance.
4. Doesn’t Expand Much, Even in the Worst Cases
Even when the data is already compressed or very small, GZIP doesn’t waste resources trying to compress it further. It’s smart enough to avoid unnecessary operations that could slow things down.
This behavior stems from the algorithm’s use of entropy encoding, which keeps file sizes from expanding in situations where compression won’t provide much benefit.
5. Free and Open Source
GZIP is open-source software, which means it’s free to use. There are no licensing fees or restrictions, so anyone can implement it without worrying about hidden costs.
It was originally designed as a free replacement for proprietary compression programs, making it an appealing choice for businesses and developers alike.
Alternatives to GZIP Compression
As websites grow, the need for more efficient data transfer methods becomes even more important. While GZIP has long been a reliable choice, there are alternatives worth considering for better compression and performance.
One such alternative is Brotli. It started as a tool for compressing WOFF2 web fonts but has since expanded to handle many data types. Brotli can compress files more effectively than GZIP. However, it requires more time and resources.
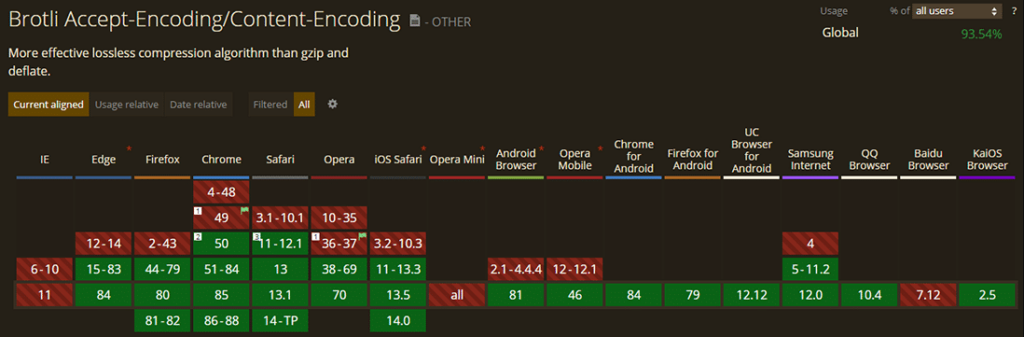
Most modern browsers support Brotli, but using it on WordPress sites might be complex. You’ll need a hosting provider that supports Brotli or allows you to install the necessary libraries. Many managed WordPress hosts don’t offer it by default. However, if you use a CDN like Cloudflare or KeyCDN, enabling Brotli becomes easier.
Switching to Brotli could provide a better balance of file compression and site performance, but it all depends on your hosting setup. If your current setup doesn’t support it, a change might be worth considering.
Tabular Overview: GZIP Compression for WordPress
Here’s a quick reference table summarizing key aspects of enabling and using GZIP compression for your website:
| Topic | Details |
| What is GZIP Compression? | A compression technique that reduces the size of text-based files (HTML, CSS, JavaScript) without losing data, speeding up website loading times. |
| How to Check GZIP Status | Use tools like GTmetrix or Check GZIP Compression.Browser developer tools: Look for "content-encoding: GZIP" in the response header. |
| Methods to Enable GZIP Compression | Plugins: WP Rocket, W3 Total Cache, WP Super Cache.htaccess File (Apache)Nginx Configuration.Contact Web Host |
| Advantages of GZIP Compression | Good Compression Ratio: Reduces file sizes by 70-90%.Fast Compression: Quick data processing for high-traffic websites. Low Memory Usage: Efficient even on limited hosting.No Unnecessary Expansion: Avoids wasting resources.Free & Open Source. |
Wrapping Up: GZIP Compression and Beyond
Enabling GZIP compression is a simple step to help speed up your website and improve user experience. But speed isn’t everything. A website needs constant care and attention to stay secure and operate smoothly. A site with fast load times but outdated security is like locking your door but leaving the window wide open.
If the technical side of running a WordPress site feels like too much, it's time to hand it over to the pros. SiteAim provides:
- WordPress maintenance and security
- WordPress support and management
- Fast solutions for hacked WordPress sites
Let the experts handle it. Visit siteaim.com and make sure your site is always running at its best!
FAQs
- Is GZIP Better Than ZIP?
GZIP is generally better for web use because it compresses files more efficiently for transfer. ZIP is commonly used for file storage but is less optimized for transferring web content.
- How Do I Enable GZIP On A Shared Hosting Environment?
In a shared hosting environment, you can enable GZIP compression through the control panel or by adding code to the .htaccess file.
- How Do I Disable GZIP Compression On My Site?
To disable GZIP, remove the code from your .htaccess file or deactivate the plugin that enables it. Some hosting providers allow you to turn it off from the control panel.
- Does GZIP Work For Dynamic Content?
Yes, GZIP can be applied to dynamic content like PHP-generated pages. This helps reduce the size of dynamic responses sent to browsers and improves load times.