Every website has a behind-the-scenes area where all the important settings live. For WordPress users, that’s cPanel. It’s where you manage your website’s files, databases, email accounts, and security settings. Whether you need to install an SSL certificate, create backups, or update PHP, cPanel makes it easy to handle everything in one place.
If your web host provides cPanel, you can access a powerful yet beginner-friendly control panel. But at first glance, it can feel overwhelming. With so many options and tools, where do you even start?
That’s where this guide comes in. We’ll break things down step by step, helping you navigate cPanel with confidence. By the end, you’ll be able to manage your WordPress site like a pro.
- What is cPanel?
- What Can You Do With cPanel?
- What Does cPanel Web Hosting Mean?
- How to Install and Access cPanel for Your WordPress Site
- How to Use cPanel: 6 Essential Features for WordPress Sites
- Installing WordPress Software with Softaculous
- Unlocking Advanced Website Management with cPanel
- Mastering cPanel for WordPress: What’s Next?
- FAQs
Let’s start by understanding what cPanel is and why it’s such an essential tool for your website.
What is cPanel?
“cPanel is a Linux-based web hosting control panel designed to simplify website and server management. It provides an intuitive graphical interface (GUI) that allows users (regardless of technical expertise) to handle essential tasks like managing domains, configuring email accounts, monitoring databases, and enhancing security.”
It was developed by cPanel, LLC, in the late 1990s using the Perl programming language. Since then, it has quickly become a go-to solution for hosting providers and website owners who need a powerful yet user-friendly tool for backend administration.
Today, it remains a staple in the web hosting industry, particularly in shared hosting environments where multiple websites operate on a single server.
Why cPanel Is the Industry Standard
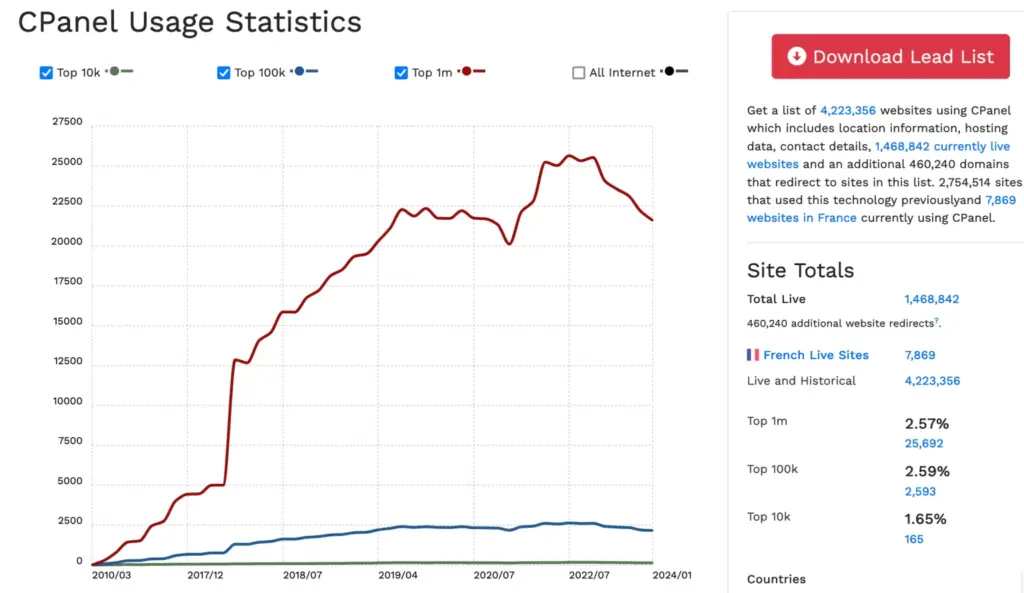
Many hosting providers offer cPanel as their default management interface because of its reliability and ease of use. According to BuiltWith, nearly 1.5 million websites actively use cPanel, making it one of the most widely adopted control panels globally.
Plesk, its closest competitor, serves a similar purpose. But cPanel’s widespread adoption keeps it ahead in popularity. Other alternatives include ZPanel, Webmin, RunCloud, DirectAdmin, and Virtualmin, though they cater to more niche use cases.
Now that we've covered cPanel and its popularity, let's look at what you can actually do with it.
What Can You Do With Cpanel?
cPanel serves as the control hub for managing every essential aspect of your WordPress site. It provides a structured and user-friendly interface packed with powerful tools that simplify website administration.
At its core, cPanel allows you to:
- Install and manage content management systems (CMS) like WordPress, Joomla, and Drupal.
- Access and modify website files using the built-in file manager.
- Create, manage, and optimize MySQL databases via phpMyAdmin.
- Set up and manage FTP accounts for smooth file transfers.
- Configure domains, subdomains, redirects, and addon domains.
- Control DNS settings with an intuitive zone editor.
- Manage email accounts, forwarders, and spam filters.
- Install SSL certificates and strengthen site security.
- Monitor server performance and track usage metrics.
- Schedule automated backups and restore website data when needed.
cPanel is designed to put everything you need at your fingertips. Its home page is divided into clearly defined categories, allowing you to navigate through various administrative tasks.
Whether you're updating site files, configuring email, managing databases, or keeping an eye on server performance, cPanel streamlines it all.
With the right know-how, this control panel transforms website management from a daunting task into a smooth and efficient process. Even if you're not a developer!
What Does cPanel Web Hosting Mean?
If you’ve been looking into web hosting, you’ve probably seen the term cPanel hosting thrown around. But what does it actually mean? Simply put, it refers to a web hosting provider that uses cPanel as the main control panel for managing your site.
Why does this matter? cPanel is one of the most widely used and trusted hosting management tools. It gives you an easy way to handle everything from setting up email accounts to managing databases, installing WordPress, and securing your site, all without messing with complicated backend settings.
Most hosting providers offer cPanel because it simplifies website management for users of all skill levels. It’s also not limited to shared hosting; you’ll find it in VPS and dedicated hosting setups.
How cPanel Simplifies Your Website Management?
Not all control panels are created equal. cPanel stands out for a reason:
- Easy to Use: You don't need to dig through confusing menus. Everything is organized in a way that makes sense, even if you're managing a website for the first time.
- No Additional Cost: While cPanel isn’t free, hosting providers include it in their plans, so you’re not paying extra.
- Stronger Security Features: You’ll usually get free SSL installation, built-in backups, and firewall options without needing to set them up manually.
- Quick WordPress Installation: Tools like Softaculous let you install WordPress in just a few clicks.
- Simple Email Management: You can easily create business email accounts linked to your domain name.
- Scalability: Works across different hosting types, so if you ever upgrade from shared hosting to VPS or a dedicated server, you’ll already be familiar with the interface.
How to Install and Access cPanel for Your WordPress Site
By now, you’ve seen how useful cPanel can be for managing your WordPress site. But if you’re wondering how I install cPanel, the short answer is you don’t have to.
Web hosting providers that offer cPanel take care of the installation for you. All you need is a hosting plan that includes cPanel access. Instead of setting up servers, configuring SSH clients, or running command-line scripts, you simply log in and start managing your website.
Here’s how to access your cPanel dashboard.
How to Access cPanel on Your WordPress Site
Your hosting provider will send you login details when you sign up. There are multiple ways to access cPanel:
- Via your web host’s dashboard: You can check your hosting account’s control panel for a direct cPanel link.
- Through your welcome email: Most hosts send a cPanel login link with your credentials.
- Using a browser URL: You can enter your domain followed by :2083 (for HTTPS) or :2082 (for HTTP).
Example:
- https://yourwebsite.com:2083
- http://yourwebsite.com:2082
- With a backup login URL: If port 2083 is blocked, you can try https://cpanel.yourdomain.com.
Once you enter your username and password, click "Login". And just like that, you’re in!
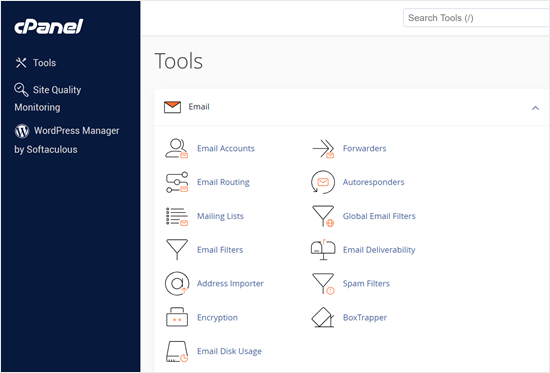
Navigating the cPanel Interface
At first glance, cPanel may seem packed with options, but its layout is designed for ease of use:
- Left Panel: Displays your hosting products and services.
- Center Section: Organized categories of tools for website management. You can even drag and reorder these sections.
- Right Sidebar: Shows server details, domain info, recent login history, and site resource usage.
- Top Search Bar: Quickly find any feature without scrolling.
If you’ve ever played a solitaire game, you can navigate cPanel. The point-and-click interface makes managing your website simple.
How to Change Password for WordPress in cPanel?
There are a couple of primary methods on how to change the password in cPanel for WordPress, such as using phpMyAdmin to reset it in the database or using Softaculous software.
1. Through phpMyAdmin:
- First, you'll need to log in to your cPanel account.
- Then, find the "phpMyAdmin" icon, usually located in the "Databases" section, and click on it.
- Once inside phpMyAdmin, you'll see a list of databases on the left. Select the database that your WordPress site uses. If you're unsure which one it is, you can find it in your WordPress wp-config.php file.
- Inside your WordPress database, look for a table named wp_users. Click on it.
- You'll see a list of users. Find your username and click the "Edit" button (or a pencil icon) next to it.
- Look for the user_pass field.
- Delete the existing encrypted password and enter your new password.
- Crucially, in the "Function" column next to the user_pass field, select "MD5" from the dropdown menu. This encrypts your new password correctly.
- Click "Go" to save your changes.
2. Through Softaculous (if available):
- Get into your cPanel account.
- Look for "Softaculous Apps Installer" or something similar.
- Find the list of your installed applications, and look for your WordPress installation.
- There should be an edit details, or manage installations button.
- Find the admin user section, and there will be a place to change the password.
- Save the changes.
Also Read: WordPress Source Code: How to Find & Access It Easily
Now that you're inside, let’s explore how to make the most of cPanel’s features.
How to Use cPanel: 6 Essential Features for WordPress Sites
cPanel is packed with features, and these features typically fall into two categories:
- Core Features: Standard tools are available across most hosting providers.
- Host-Specific Add-ons: Extra features introduced by the hosting provider, such as built-in caching, security tools, or WordPress optimizations.
While these additional tools can influence your choice of hosting provider, the core features of cPanel are what make day-to-day management simple and efficient.
Let’s explore some of the most useful ones.
1. Installing WordPress via cPanel
If your hosting plan includes cPanel, installing WordPress is a breeze. All thanks to Softaculous, an automated installer that sets up WordPress in just a few clicks.
Here’s how:
- Log into cPanel and search for "Softaculous" in the search bar.
- Click on Softaculous Apps Installer, then select the WordPress logo.
- Hit the Install Now button and configure the installation:
- Choose the WordPress version.
- Select HTTP or HTTPS (SSL should already be enabled for security).
- Set your site name, language, and admin credentials.
- Pick a theme (optional) or install the default one.
- Click Install, and within minutes, your site is ready.
If you’re using shared hosting, this method is a huge time-saver. It eliminates the need for manual file uploads or database configurations.
2. Creating a Professional Email Address in cPanel
A branded email address (like [email protected]) instantly makes your business look more professional than a generic Gmail or Yahoo address. If you’re using cPanel, setting up a custom email address linked to your domain is quick and straightforward.
Here’s how:
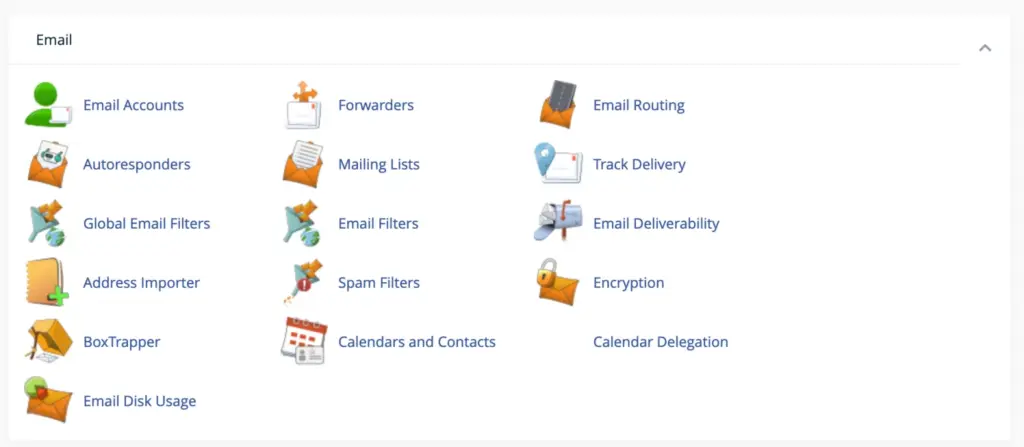
Step 1: Access the Email Accounts Section
Log in to your cPanel and navigate to the “Email Accounts” section. If your hosting plan supports multiple domains, choose the one you want to associate with your new email address.
Step 2: Create a New Email Account
Click the “Create” button and fill in the required fields:
- Select the domain for your email (e.g., @yourwebsite.com).
- Enter the part before the “@” (e.g., info, sales, or support).
- Choose a secure password or use the “Generate” button for a strong, auto-created one.
- Set a mailbox quota or select “Unlimited” for hassle-free storage management.
Once done, click “Create”. Now, your professional email address is ready to use.
Step 3: Manage Your Email Account
After creating your email, you can customize settings to fit your needs:
- Click “Check Email” to access your inbox directly from cPanel.
- Select “Manage” to update passwords, storage limits, or other preferences.
- Use “Connect Devices” to set up your email on Outlook, Gmail, or another email app.
Step 4: Customize Email Settings
Fine-tune your email experience with additional features:
- Autoresponders: You can set up automatic replies when you’re unavailable.
- Forwarding: You can redirect incoming emails to another address.
- Spam Filters: You can control unwanted messages and prevent junk mail from clogging your inbox.
These simple steps give you full control over your email communications.
3. Creating a Subdomain in cPanel
A subdomain helps you organize different sections of your website while keeping them under the same main domain. Need a separate space for testing? Want a dedicated forum or an online store? A subdomain lets you do that without disrupting your primary site.
For example, you could set up:
- forum.yourdomain.com for a community discussion platform
- shop.yourdomain.com for an independent eCommerce store
- dev.yourdomain.com as a safe testing environment for updates
Creating a subdomain in cPanel is straightforward.
Here’s how to do it:
- Log in to cPanel and locate the Domains section.
- Click on Subdomains.
- Enter the name of your subdomain (e.g., shop if you want shop.yourdomain.com).
- Select the primary domain under which this subdomain will be created.
- Define the root folder where the subdomain’s files will be stored on your server. This is where your subdomain’s content will be hosted.
Once created, the subdomain acts as an independent section of your website. For example, if you install WordPress on shop.yourdomain.com, it will function separately from your main site while still being part of your domain.
This setup is ideal for eCommerce stores, forums, support portals, or development environments. It allows you to segment your site efficiently without complicating your main website’s structure.
4. Creating a WordPress Redirect in cPanel
If you ever need to redirect one URL to another, cPanel's built-in redirection tool makes it easy. Instead of manually editing configuration files or dealing with complicated code, you can set up a redirect with just a few clicks.
To get started, go to the Domains section in cPanel and locate the Redirects option. This feature allows you to seamlessly direct traffic from one URL to another.
Choosing the Right Redirect Type
Before setting up a redirect, it’s important to understand the two types available:
- Permanent (301): Use this when you want a long-term redirect. This tells search engines that the original URL is permanently replaced, ensuring SEO benefits pass to the new page.
- Temporary (302): Ideal for short-term changes, like when you’re redesigning a page but plan to bring it back later.
Setting Up the Redirect
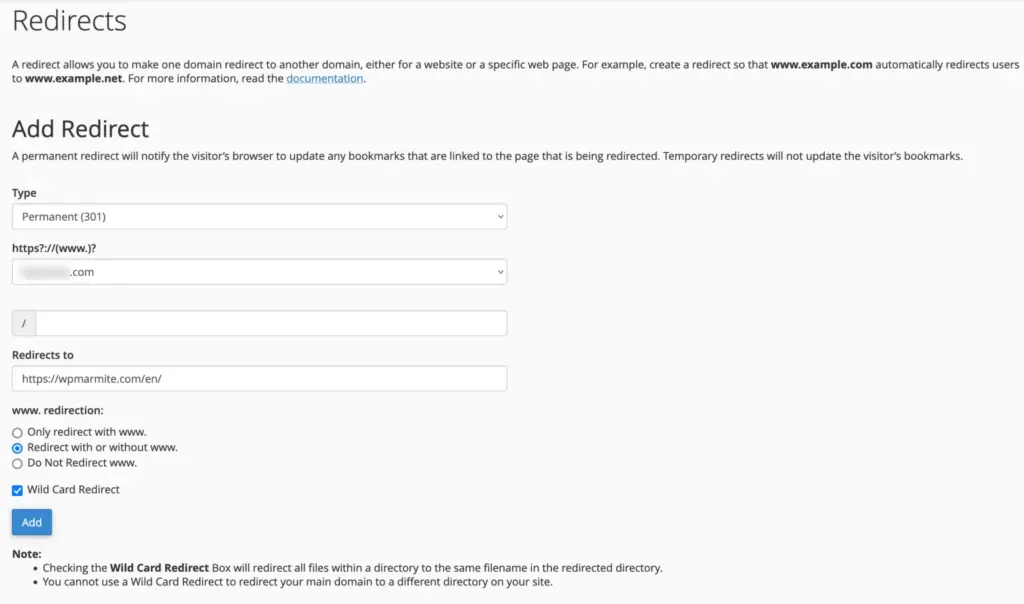
Once inside the Redirects tool, follow these steps:
- Select the Redirect Type: Choose between 301 (permanent) or 302 (temporary) based on your needs.
- Choose the Domain: A drop-down will show all the domains associated with your hosting account. Pick the one you want to redirect.
- Enter the Destination URL: In the Redirects to field, type the URL to which visitors should be sent.
- Set Redirect Preferences: Decide if you want the redirect to apply:
- Enable Wild Card Redirect (If needed): If you’re redirecting an entire domain to a new one, check this box. This ensures that all subpages from the old domain automatically point to their respective counterparts on the new site.
Once everything is set, click Add Redirect, and cPanel will take care of the rest. Your redirect is now active, ensuring a smooth experience for visitors while preserving your site’s SEO value.
5. Managing Files and Your FTP Account in cPanel
A well-organized file structure is the backbone of any website, and cPanel’s File Manager makes it easy to upload, edit, and manage your site’s files without needing external tools. But if you want more control (especially when handling large files) File Transfer Protocol (FTP) is the way to go.
Uploading and Managing Website Files via File Manager
For quick and easy file uploads, cPanel’s File Manager is your best bet:
- Open File Manager: Head to your cPanel dashboard and locate File Manager under the “Files” section.
- Navigate to the Right Folder: Your website’s main files usually live in the public_html folder. If you’re working on a subdomain or addon domain, find its respective directory.
- Upload Your Files; Click Upload, choose the files from your computer, and let cPanel handle the rest.
- Manage Your Files: Once uploaded, you can move, rename, delete, or edit files directly within File Manager’s interface.
Using FTP for Bulk File Transfers
If you’re dealing with multiple or large files, using an FTP client like FileZilla gives you greater flexibility:
- Set Up an FTP Account: In cPanel, go to FTP Accounts under the “Files” section and create a new account if needed.
- Connect Using an FTP Client: Download FileZilla (free and widely used), enter your FTP credentials (host, username, password, and port), and connect to your server.
- Upload Files: Drag and drop files from your computer into your website’s directory.
Manually uploading files isn’t always necessary for first-time users. WordPress and most CMS platforms can be installed effortlessly using Softaculous, which we’ll cover later.
However, mastering File Manager and FTP will make site management much easier if you ever need direct access to your files.
6. Managing Databases in cPanel
Databases are the foundation of most websites, particularly if you're using a content management system (CMS) like WordPress. Every post, user account, and setting is stored in a database, making it essential to manage it properly.
Fortunately, cPanel simplifies this process.
Setting Up and Managing Databases in cPanel
Managing databases doesn’t require technical expertise when you’re using cPanel.
Here’s how you can do it:
- Creating a Database: Head to the Databases section in your cPanel dashboard and select MySQL Databases. Enter a name for your new database and click Create Database.
- Adding a User: Every database needs a user with permission to access and modify it. Scroll down to the MySQL Users section, create a new user, and set a secure password. Then, link this user to your database and assign privileges (either All Privileges for full control or custom permissions for limited access).
- Connecting Your Website: To link your website to the database, use the database name, username, and password. WordPress users typically handle this automatically during installation or using Managed WordPress Hosting.
- Using phpMyAdmin: This built-in tool allows you to manage your database visually. Access it from cPanel to manually edit tables, import/export data, or troubleshoot issues.
Installing WordPress Software with Softaculous
Getting your website up and running shouldn’t be complicated, and Softaculous ensures that. If you’re new to website management, manually installing WordPress or other applications might seem intimidating.
That’s where this one-click installer steps in.
With Softaculous, you can install WordPress, Joomla, Drupal, and many other web applications in just a few steps:
- Head to the “Software” or “Softaculous Apps Installer” section in your cPanel.
- Pick the application you want to install (WordPress, Joomla, Drupal, or others).
- Follow the on-screen instructions, entering essential details like your site name and admin credentials.
- Click “Install”, and Softaculous will take care of the rest, including database setup.
In minutes, your site is live without the hassle of manual configuration.
Unlocking Advanced Website Management with cPanel
Managing a website isn’t just about setting it up. It's about optimizing, securing, and fine-tuning it to run smoothly. Consider cPanel as your website’s command center, offering powerful tools that go beyond the basics.
1. Security
A secure website is a reliable website, and cPanel provides multiple layers of protection:
- Password Strength Enforcement; Ensures all cPanel and email accounts use strong, unique passwords to prevent unauthorized access.
- Hotlink Protection: Stops other sites from directly linking to your images and files, preventing bandwidth theft.
- Two-Factor Authentication (2FA); Adds an extra layer of security by requiring a secondary authentication method (like a mobile-generated code) to log in.
- SSL Certificates: Encrypts data between your website and visitors, enhancing security and credibility. Most hosting providers offer free SSL installation via cPanel.
- Firewalls & IP Blocking: Protects against DDoS attacks by blocking malicious IP addresses.
2. Automated Backups
Accidents happen. Be it a coding error, an update gone wrong, or a security breach. That's why backups are essential.
cPanel makes it easy to create and restore backups in just a few clicks:
- Go to the “Backup” or “Backup Wizard” section in cPanel.
- Choose between a full backup (everything) or a partial backup (specific files or databases).
- Click “Generate Backup” to download and store a copy of your site.
3. Website Performance
A slow website frustrates visitors and hurts your search rankings. Luckily, cPanel offers several tools to optimize speed and performance:
- Gzip Compression: Compresses website files to reduce load times.
- Image Optimization: Helps reduce image sizes without compromising quality.
- Performance Tweaks: cPanel provides caching tools and configuration options to enhance site speed.
cPanel for WordPress: Practical User Table
| Task You Want To Do | How cPanel Helps | Quick Steps (Where to Find It) |
| Install WordPress Quickly | One-click setup, no technical skills needed. | Use Softaculous Apps Installer. Select WordPress, fill in the details, and click Install. |
| Create a Professional Email | Use your domain name for email (e.g., [email address removed]). | Go to Email Accounts. Click Create, enter details, and save. |
| Organize Website Sections | Create subdomains (e.g., blog.yourdomain.com). | Go to Subdomains in the Domains section. Enter the subdomain name, select the domain, and create. |
| Redirect Old Pages | Send visitors to new pages automatically (301 or 302 redirects). | Go to Redirects in the Domains section. Choose type, enter URLs, and add a redirect. |
| Manage Website Files | Upload, edit, or delete files directly. | Use File Manager (Files section) for basic tasks or FTP Accounts (Files section) for bulk uploads. |
| Change WordPress Password | Reset your password directly through the database. | Use phpMyAdmin (Databases section) to edit the wp_users table or Softaculous (if available) to edit the installation details. |
| Secure Your Site | Enable SSL, and protect against attacks. | Use SSL/TLS (Security section) to install SSL; use IP Blocker to block malicious IPs. |
| Backup Your Site | Create copies of your website for safekeeping. | Go to Backup Wizard (Files section). Choose full or partial backup, and download. |
| Manage Databases | Create, edit, or delete databases. | Use MySQL Databases or phpMyAdmin (Databases section). |
Mastering cPanel for WordPress: What’s Next?
cPanel simplifies website management, but true optimization goes beyond just knowing the basics. With features like the WordPress Toolkit for cPanel, you can streamline updates, enhance security, and improve performance.
However, keeping a site running smoothly requires ongoing attention. If managing it all feels overwhelming, services like SiteAim can handle the heavy lifting. We ensure your cPanel for WordPress setup is always optimized, secure, and performing at its best.
Call us today to optimize cPanel for WordPress with expert guidance.
FAQs
1. What is better: Plesk or cPanel for WordPress?
Both Plesk and cPanel offer great tools for managing WordPress, but cPanel is often preferred for its simplicity and widespread adoption. On the other hand, Plesk provides better support for Windows hosting. The best choice depends on your hosting environment and personal preference.
2. Is cPanel free?
No, cPanel is a licensed software. However, many web hosting providers include it in their plans at no extra cost. Some may offer it free for the first year and then charge a fee later.
3. Is cPanel private?
Yes, your cPanel account is private and should be protected with a strong password. Enabling two-factor authentication (2FA) adds an extra layer of security to keep your website safe from unauthorized access.
4. Where is cPanel in Managed WordPress Hosting?
Managed WordPress hosting does not typically include cPanel, as the hosting provider handles tasks like WordPress installation, server-level caching, backups, and updates for you.
5. Where is cPanel in VPS Hosting?
cPanel may not be pre-installed on VPS hosting. However, many providers offer it as an optional add-on. You can check with your provider, install it during setup, or manually add it if your plan allows.
6. What is the difference between cPanel and Web Host Manager (WHM)?
cPanel is for website owners to manage their sites, emails, and databases. WHM is a more advanced tool hosting providers use to manage multiple cPanel accounts and configure server settings.
7. Do all WordPress hosts use cPanel?
No, some hosting providers use their own control panels instead of cPanel. If you’re unsure which one your host offers, check their support documentation or contact them directly.
8. Do you need cPanel for WordPress?
Not necessarily. While cPanel makes managing a WordPress website easier, WordPress itself can run on any server, even without cPanel. Some hosting providers offer alternative control panels or custom dashboards.
9. How can I back up my WordPress website using cPanel?
Go to the Backup Wizard in cPanel, choose whether you want a full or partial backup, and download the backup file to keep your data safe.
10. Can I use cPanel to manage multiple WordPress websites?
Yes! You can host multiple WordPress sites under the same cPanel account by setting up separate domains and databases. Some hosting plans even include tools like Softaculous to make managing multiple sites easier.
11. What should I do if I encounter issues with cPanel or my WordPress website?
First, try checking your hosting provider’s help documentation. If the issue persists, contact their support team. They can troubleshoot and resolve technical problems for you.
12. How to get cPanel for WordPress?
If your hosting plan includes cPanel, you can access it through your hosting provider’s dashboard. Look for a link labeled “cPanel” or “Control Panel” in your account settings.
13. Is cPanel part of WordPress?
No, cPanel and WordPress are separate tools. cPanel is a control panel for managing your hosting environment, while WordPress is a content management system (CMS) for building websites.